HTML & CSS - 10 Ways to Minimize Reflows and Improve Performance
Despite web pages reaching 2MB performance remains a hot topic. The slicker your application, the better the user experience and the higher the conversion rate!
That said, I’m guilty of adding superficial CSS3 animations or manipulating multiple DOM elements without considering the consequences. Two terms are used in the browser world when visual affects are applied:
Repaints
A repaint occurs when changes are made to elements that affect visibility but not the layout. For example,
A repaint occurs when changes are made to elements that affect visibility but not the layout. For example,
opacity, background-color, visibility, and outline. Repaints are expensive because the browser must check the visibility of all other nodes in the DOM — one or more may have become visible beneath the changed element.
Reflows
Reflows have a bigger impact. This refers to the re-calculation of positions and dimensions of all elements, which leads to re-rendering part or all of the document. Changing a single element can affect all children, ancestors, and siblings.
Reflows have a bigger impact. This refers to the re-calculation of positions and dimensions of all elements, which leads to re-rendering part or all of the document. Changing a single element can affect all children, ancestors, and siblings.
Both are browser-blocking; neither the user or your application can perform other tasks during the time that a repaint or reflow occurring. In extreme cases, a CSS effect could lead to slower JavaScript execution. This is one of the reasons you encounter issues such as jerky scrolling and unresponsive interfaces.
It’s useful to understand when reflows are triggered:
Adding, removing or changing visible DOM elements
The first is obvious; using JavaScript to change the DOM will cause a reflow.
The first is obvious; using JavaScript to change the DOM will cause a reflow.
Adding, removing or changing CSS styles
Similarly, directly applying CSS styles or changing the class may alter the layout. Changing the width of an element can affect all elements on the same DOM branch and those surrounding it.
Similarly, directly applying CSS styles or changing the class may alter the layout. Changing the width of an element can affect all elements on the same DOM branch and those surrounding it.
CSS3 animations and transitions
Every frame of the animation will cause a reflow.
Every frame of the animation will cause a reflow.
Using offsetWidth and offsetHeight
Bizarrely, reading an element’s
Bizarrely, reading an element’s
offsetWidth and offsetHeight property can trigger an initial reflow so the figures can be calculated.
User actions
Finally, the user can trigger reflows by activating a
Finally, the user can trigger reflows by activating a
:hover effect, entering text in a field, resizing the window, changing the font dimensions, switching stylesheets or fonts.
The reflow processing flow hit will vary. Some browsers are better than others at certain operations. Some elements are more expensive to render than others. Fortunately, there are several general tips you can use to enhance performance.
1. Use Best-Practice Layout Techniques
I can’t believe I need to say this in 2015 but don’t use inline styles or tables for layout!
An inline style will affect layout as the HTML is downloaded and trigger an additional reflow. Tables are expensive because the parser requires more than one pass to calculate cell dimensions. Using
table-layout: fixed can help when presenting tabular data since column widths are based on the header row content.
Using
flexbox for your main page layout can also have a performance hit because the position and dimensions of flex items can change as the HTML is downloaded.2. Minimize the Number of CSS Rules
The fewer rules you use, the quicker the reflow. You should also avoid complex CSS selectors where possible.
This can be especially problematic if you’re using a framework such as Bootstrap — few sites use more than a fraction of the styles provided. Tools like Unused CSS, uCSS, grunt-uncss, and gulp-uncss can significantly reduce your style definitions and file sizes.
3. Minimize DOM depths
Slightly trickier — reduce the size of your DOM tree and the number of elements in each branch. The smaller and shallower your document, the quicker it can be reflowed. It may be possible to remove unnecessary wrapper elements if you’re not supporting older browsers.
4. Update Classes Low in the DOM Tree
Make class changes on elements as low in the DOM tree as possible (i.e. elements that don’t have multiple deeply nested children). This can limit the scope of the reflow to as few nodes as necessary. In essence, only apply class changes to parent nodes such as wrappers if the effect on nested children is minimal.
5. Remove Complex Animations From the Flow
Ensure animations apply to a single element by removing them from the document flow with
position: absolute; or position: fixed;. This permits the dimensions and position to be modified without affecting other elements in the document.6. Modify Hidden Elements
Elements hidden with
display: none; will not cause a repaint or reflow when they are changed. If practical, make changes to the element before making it visible.7. Update Elements in Batch
Performance can be improved by updating all DOM elements in a single operation. This simple example causes three reflows:
var myelement = document.getElementById('myelement');
myelement.width = '100px';
myelement.height = '200px';
myelement.style.margin = '10px';
We can reduce this to a single reflow which is also easier to maintain, e.g.
var myelement = document.getElementById('myelement');
myelement.classList.add('newstyles');
.newstyles {
width: 100px;
height: 200px;
margin: 10px;
}
You can also minimize the times you need to touch the DOM. Let’s assume you wanted to create this bullet list:
- item 1
- item 2
- item 3
Adding each element one at a time causes up to seven reflows — one when the
<ul>is appended, three for each <li> and three for the text. However, a single reflow can be implemented using a DOM fragment and building the nodes in memory first, e.g.var
i, li,
frag = document.createDocumentFragment(),
ul = frag.appendChild(document.createElement('ul'));
for (i = 1; i <= 3; i++) {
li = ul.appendChild(document.createElement('li'));
li.textContent = 'item ' + i;
}
document.body.appendChild(frag);8. Limit the Affected Elements
Avoid situations where a large number of elements could be affected. Consider a tabbed content control where clicking a tab activates a different content block. The surrounding elements would be affected if each content block had a different height. You may be able to improve performance by setting a fixed height for the container or removing the control from the document flow.
9. Recognize that Smoothness Compromises Performance
Moving an element one pixel at a time may look smooth but slower devices can struggle. Moving the element by four pixels per frame requires one quarter of the reflow processing and may only be slightly less smooth.
10. Analyze Repaint Issues with Browser Tools
All mainstream browsers provide developer tools that highlight how reflows affect performance. In Blink/Webkit browsers such as Chrome, Safari, and Opera, open the Timeline panel and record an activity:
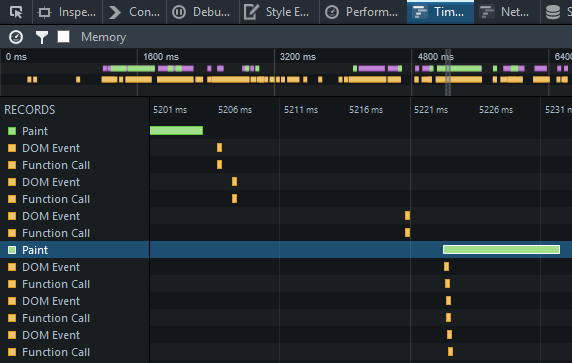
A similar Timeline panel is available in the Firefox Developer Tools:
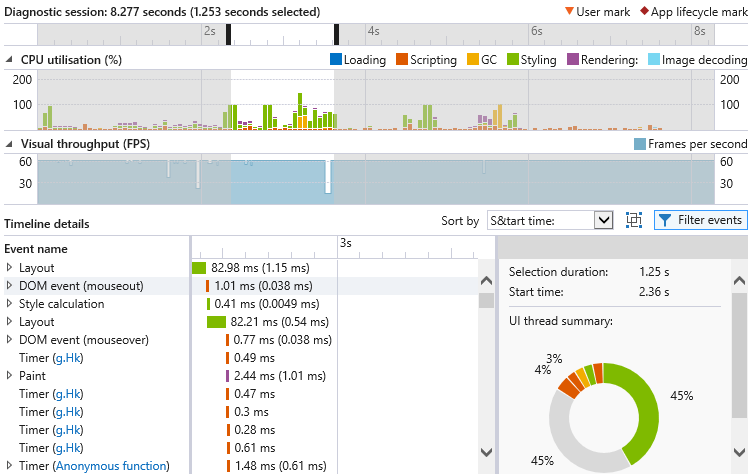
The panel is named UI Responsiveness in the Internet Explorer F12 Developer Tools:
All browsers display reflow and repainting times in green. The tests above were simple examples not involving significant animation yet layout rendering requires more time than other factors such as scripting. Reduce your reflows and better performance will follow.
If you’ve had success in improving performance in your animations and UIs using these or other suggestions, let us know in the comments.
출처 : https://www.sitepoint.com/10-ways-minimize-reflows-improve-performance/


